Making spherical HDR images

One of the crucial task of a Visual Effects supervisor on set is to shot spherical degree high dynamic range (HDR) panoramas. Those panoramas can be very useful in post production as a source of light or just a good reference for computer generated environments. This article  goes through all the steps required to create basic HDRIs.

Reasons to do on set HDRI capture

  • Use in 3D application for image based lighting
  • Use as background or base for a matte painting
  • 360 degree environment projections
  • Reference of the environment

Equipment

  • Camera: Canon 5D Mark 2
  • Lens: Canon 8 mm
  • Tripod
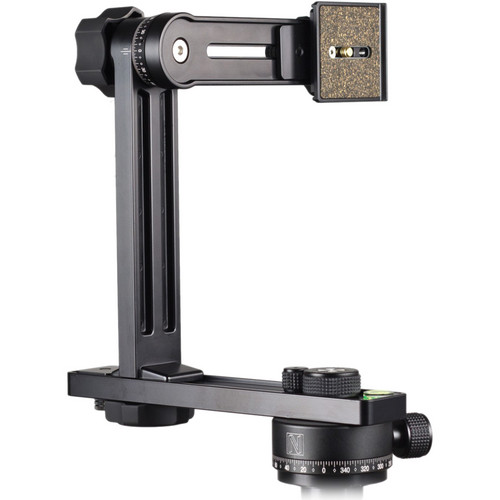
  • Nodal Ninja (Figure 1)
  • Smartphone or pan and paper
  • Camera remote (optional)
image04
Figure 1: Nodal Ninja

 Shooting Procedure

  • Mount Nodal Ninja on the tripod head.
  • Mount your camera on Nodal Ninja (NN)
  • Configure Nodal Ninja
How to find you lens nodal point
Nodal Ninja manual

Configuring the tripod

Level your tripod as shown on the Figure 2.

image03
Figure 2: Properly leveled tripod

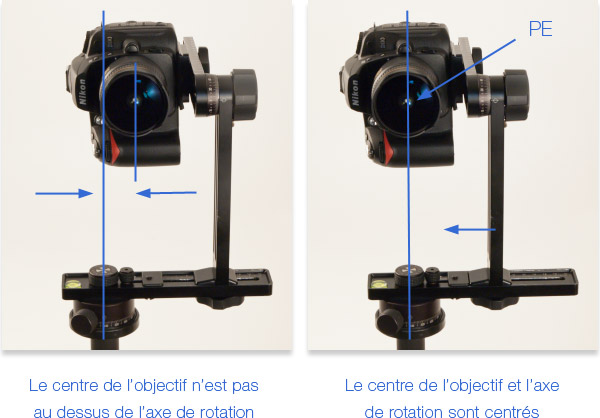
Configuring Nodal Ninja

Nodal Ninja purpose is to take parallax free images to make it suitable for stitching in one continues panorama later on.

image01
Figure 3: Setting the nodal point side, [1]
image05
Figure 4: Setting the nodal point front, [1]

Shooting process

As a professional you have to be consistent with your results. That why it is very important to have a clearly defined procedure in place. This video will explain what to check before shooting  and how to properly shoot HDRIs

Before shoot checklist

  • Tripod leveled
  • Shoot a slate
  • Image is in focus
  • Camera set to manual mode (M)
  • Autofocus is disabled
  • White balance is locked
  • The exposure note change between each bracket shoot and follow repetitive pattern (e.g 1/25, 1/100, 1/400, 1/25, 1/100, 1/400, and so on).
  • ISO set no higher than 800

Shoot set of picture with different exposure in 4 direction (90 degree angle)

Assuming that you use 8 mm lens on full frame camera. You have to end up with overlapping pictures for each direction

Depending on your goal you can shoot between 3-5 pictures for each direction with 1 or 2 f-stop difference.

Slate

It is a good practice to shoot a slate for every panorama that you shooting. The reason for that is when you stiching your photos it might be difficult to find where is one sequence ends and another begins. An example of a slate by using a smartphone illustrated on the Figure 5.

Slate for each panorama should include:
  • Project name
  • Scene (e.g. Forest, Silver Lake, Garage Interior etc.)
  • Point Number (Different shooting point within the same scene)
image02
Figure 5: Example of  Android slate

Stitching images together

I would recommend PTGui for stitching your images. It does fantastic job combining multiple exposure Canon RAW images and then stitching it together.
If you did not messed up alignment or image exposure along the way this process should be automatic.

image00
Figure 6: Example of final lat-long panorama

Sources


Life abroad in California | Sergii

I decided to record a series of interviews dedicated to people living and working abroad in California. This interview is with my good friend, artist and developer Sergii Dumyk. I met him under unexpected circumstances and since then follow his unusual way of exploring San Francisco.

Maya shader transparency and alpha multiplication

Problem statement: Black edges on object with transparency in Maya 2015, VRay 3.0.

Everyone who ever worked on integration of computer generated (CG) image over a life action video knows unpremult/premult workflow. The main ruke is before applying any color corrections to CG render it must be divided by alpha channel (unmultiplied). The whole thing about pre-multiplication and transparency is quite simple.

What in Nuke jargon sounds like “premult” in normal math language is

newRGB = RGB * Alpha

Similar for “unpremul”

newRGB = RGB / Alpha

The problem occur when you get footage which is already premultiplied and you multiply your RGB channel by Alfa again. In fact that exactly what happening when you try to use some footage with Alfa channel as transparency in Maya.

If you think your image is Unpremultiplied (but it’s really Premultiplied) and you add a Premult node you basically multiply the image twice (RGB x Alpha x Alpha). If you have an RGB pixel of 0.6 and you multiply it by the alpha pixel of 0.4 you get a correct value of 0.24 for that RGB pixel. But if you premultiply the image twice you are effectively doing 0.6 x 0.4 x 0.4 giving you a value of 0.096, which darkens the edge.

There are situations when you will want to Unpremultiply an image. The general rule for any form of colour correction is: Unpremult the image first, do the colour correction and then Premult back to its correct state. This is so you don’t accidentally colour correct any of the transparent Alpha edges. [2]

nuke_unpremult
Correct workflow with premulted assets [1]
nuke_no_unpremult
Correct workflow with premulted assets causing black edge artifact [1]
Sources

  1. http://yamagishi-2bit.blogspot.com/2012/06/aftereffectspremultiplyunpremultiply.html
  2. http://www.spherevfx.com/written-training/miscellaneous-written-training/understanding-premultiplied-images/

Nodejs | Function Closures and Scope

The task is to execute a function with a callback multiple times but each time I want to pass my loop ‘item’ variable to the callback function.

Let’s consider the following code example.

for (var item = 0; item < 3; item++) {

    /* 
        This function gets called immediately,
        however execCallback will not.
        Note that this function won't block the execution
    */
    setTimeout(callback, 100);

    function callback() {

        /*
            Since setTimeout need 100 milesecond
            console.log will be executed
            only when 'for' loop is finished 
            leaving as with item = 10
        */
        console.log(item);

    }

    // This console.log will executed immidiately
    console.log('Item: %s', item)

}

This is the code output

λ node callback-args_02.js
Item: 0
Item: 1
Item: 2
3
3
3

We can see that item gets logged immediately 3 times but callback returned 100 ms later when the item was on its last value which is 3. How can we male callback aware of current loop iteration?

We can do that by cloning the value of ‘item’ variable into the scope of another function which can not be altered from higher level.

A closure is an expression (typically a function) that can have free variables together with an environment that binds those variables (that “closes” the expression).Since a nested function is a closure, this means that a nested function can “inherit” the arguments and variables of its containing function. In other words, the inner function contains the scope of the outer function. [1]

The following example demonstrate the concept of local and global scope

var globalVar = "I'm global var";

function myFunc() {

    // This will create globalVar in local context of myFunc
    // which doesn't interfear with the global one
    var globalVar = "I'm local var";
    return globalVar;

}

console.log('myFunc scope globalVar:', myFunc());
console.log('Global scope globalVar:', globalVar);

Output:

λ node scope-example.js
myFunc scope globalVar: I'm local var
Global scope globalVar: I'm global var

The other very important moment to understand is that function can return another function. Please consider the following example.

function addNum(x) {
    // addNum return anonymous function
    return function (y) {
        // Note how x value accessible to this scope 
        return x + y;
    };
var addTwo = addNum(2);

console.log(addTwo(4));

Notice how value 2 gets saved inside of addTwo object scope. This might be used to solve our original callback problem.

Let’s wrap our setTimeout into another function. By doing so we will crate function closure and create new object with our ‘item’ value for every iteration of the loop.

for (var item = 0; item < 3; item++) {

    /*
        New objec created from callWraper every iteration of the loop
        it will preserve our item number for callback
    */
    function callWrapper(i) {

        setTimeout(callback, 100);

        function callback(){
            /*
                Since callback function is a child of
                callWrapper it will have access to its scope
            */
            console.log(i);
        }

    } 

    callWrapper(item);

    // This console.log will executed immidiately
    console.log('Item: %s', item)
}

Result

λ node callback-with-args-example.js
Item: 0
Item: 1
Item: 2
0
1
2

Now we calling setTimer asynchronously and preserving the ‘item’ value to print it later to the console.

Sources

  1. https://developer.mozilla.org/en-US/docs/Web/JavaScript/Guide/Functions#Closures

Maya Particle Instancer to Geometry

Vital tool!

Found a potentially life-saving python script by Sagroth that coverts your particle instancer into individual animated geometry.

Great for making minor tweaks such as removing intersecting geometry and adding/reducing rotations etc …

Download it from actual site: http://www.sigillarium.com/blog/lang/en/726/

View original post

Maya Linear Workflow vs. Texture Gamma

Linear workflow is the subjects of a lot of mysteries. Indeed, it is convoluted an hard to understand especially if there are multiple ways to achieve similar but not the same result.
Linear workflow mean that all your images going trough the pipiline in linear color space. For example render output from Maya in linear space go to Nuke where get processed and render to final delivery format in sRGB.
In this article I want to show my observation end experiments that I’ve done with V-Ray and Maya and how at firs glance similar things  can produce quite different result.

The most important thing to know is that all of the renders perform calculation with linear colors, thus all the sources supplied, such as texture images, has to be linear. People often forget that shaders also need to be supplied with linear images.

Most of the source files (.jpg, png, tif, etc.) used as textures have non-linear gamma (2.2) applied to it.

Majority of render engines perform texture filtering in two places. First, when a shader process a texture, second, when the render engine calculating the image (anti-aliasing). As a matter of fact, we want to convert our images before shader start to perform its calculations, otherwise when it come to applying filtering the math will be wrong.

When you select you gamma conversion in application there are usually a couple choices sRGB and Gamma 2.2. This color spaces have slightly different curve which probably will be undistingvishble.  Here is an example of two overlapping curve taken from Nuke LUT Settings.

sRGB_Gamma2.2_difference

My test set up include two texture images. One texture used as is with gamma 2.2 color space, another was converted to linear by using Nuke Colorspace node.

brick_2_2_gamma brick_linear_gamma

nuke_2.2_to_linear

First I went and disabled all of the filtering on texture as well as in render settings in order to get clean more predictable result. In term of linear workflow I’ve been testing the following cases:

Input Option
Case 1 Texture in gamma 2.2 Linear Workflow Toggle On
Case 2 Texture in gamma 2.2 Vray Texture Input Gamma 2.2
Case 3 Linear Texture All off

Here is example with  Vray Texture Input Gamma 2.2.

vray_extra_attribute

This image show Linear Workflow Toggle On.

vray_linear_workflow

With linear workflow toggle ON you will get warning saying that linear workflow toggle was deprecated but documentation doesn’t explain why, I also tried to find information on  Chaos Group forum with no luck.

Linear workflow – this option is deprecated and will be removed in future versions of V-Ray. When this option is checked V-Ray will automatically apply the inverse of the Gamma correction that you have set in the Gamma field to all VRayMtl materials in your scene. Note: this option is intended to be used only for quickly converting old scenes which are not set up with proper linear workflow in mind. This option is not a replacement for proper linear workflow.
http://docs.chaosgroup.com/display/VRAY3/Color+Mapping#

The following image demonstrate the difference between Linear Workflow Toggle and on texture gamma correction. One main thing to note here that image corrected with VRay Extra Attribute (Case 2) has now difference with linear image without any correction (Case 3). On the other hand, image witch rendered with linear workflow toggle on has noticeable degradation in dark colors.

gamma_difference

Most likely degradation happening due to filtering process that happening when texture get process by shader. By specifying texture input gamma on shader VRay can interpret texture to linear work space before doing the actual calculation. In case when linear workflow is turned on in render settings the texture gets filtered with non-linear gamma which lead to some errors in shader math and only after that render convert the texture to linear work space and perform further calculations.

Resources

This article was inspired by the great tutorial from Alexey Mazurenko. Unfortunately only available in Russian.
https://vimeo.com/53806660

Fabulus paper from siggraph about RENDERMAN

http://old.siggraph.org/publications/2006cn/course25.pdf

What Ri spec newer told you

http://renderman.pixar.com/view/what-the-rispec-never-told-you

Houdini Materials Override

Overriding materials in Houdini  not a simple task that you might think. There are many ways to do so such as Takes or shop_surfacepath method mention here (http://forums.odforce.net/topic/13385-global-material-override/)

Python Filtering technic described in the same post by King Tapir work pretty well and do not required that all of your material assigned on the object level. However, it might be difficult to figure out how to use it for the first time.

Made a .py file. In my case it called filter.py and contain following code.

import mantra

def filterInstance() : 
    mantra.setproperty('object:surface', 'op:/shop/AO'.split())
    mantra.setproperty('object:overridedetail', 1)

print "Python Filter Finished"
filterInstance() Called just prior to the ray_end statement which locks off the settings for an instance object. The function can query object: settings and possibly alter them.
object:surface = ('') The surface shader attached to the object.
vm_overridedetail / object:overridedetail = ('false') When geometry has shaders defined on a per-primitive basis, this parameter will override these shaders and use only the object’s shader. This is useful when performing matte shading on objects.
Not supported for per-primitive material assignment (material SOP).
'op:/shop/AO' Shop material that we going to override

Tell mantra to use this file as a Python Filter

command

Also, don’t forget to force writing of all shaders into .idf by setting Declare All SHOPs.

declare_all_shops

Create a simple SHOP material in this case I’m doing very simple Ambient Occlusion shader.

oclusion

If everything set correctly you should see the print output “Python Filter Finished” in your console.

Screen Shot 2015-03-20 at 12.15.22 PM

This is my result

un_ao_test

Useful links to explore:

http://www.sidefx.com/docs/houdini11.0/rendering/ifd

Converting Houdini Not Commercial Files

The fact that Houdini convert any comercial scene to non-commercial the moment you past any hipc content was bothering me for a long time. My school has an educational license of Houdini which works without any limitation within the school network. But often I want to reuse my asset created in school for other projects, however an attempt to do so transform my .hip file into apprentice version with all of the limitations applied.

By watching Ari Denesh tutorials (https://vimeo.com/60757344) I found a couple very useful commands.

opscript command that allows you to dump any Houdini scene to a text file in Hscript format.

cmdread command allows you to execute Hscript commands from a file. 

Here is a simple example of usage. 

In a non-comercial scene:

opscript -G -r / > $TEMP/temp.cmd

And when in a new commercial scene to load generated file.

cmdread $TEMP/temp.cmd

Note that this approach wont export digital assets content. All of the asset need to be unlocked for this approach to work.

Some people asked me for more detailed description of how to convert files. Here is step by step guide.

1. Open your hipc.

2. Go to Windows > Hscript Textport

3. In the opened window type opscript -G -r / > $TEMP/temp.cmd

4. Press Enter. That command should dump your scene to $TEMP/temp.cmd text file.

5. Now open an empty hip file.

6. Type the following command to Hscript Texport cmdread $TEMP/temp.cmd That will read previously dumped script from $TEMP/temp.cmd

Check the opscript documentation for more info https://www.sidefx.com/docs/houdini/commands/opscript.html

And cmdread https://www.sidefx.com/docs/houdini/commands/cmdread.html

Unpacking Houdini Files

Just stumble across this thread

http://www.sidefx.com/index.php?option=com_forum&Itemid=172&page=viewtopic&p=28954&sid=2170ee4566cf91f7b356d0951dcf0501

It took me some time to figure it out because standard “hexpand” utility doesn’t quite work on Windows. I also fail to solve “Permission denied” error discoursed in the thread.

Finally, I just use “hcpio.exe” utility. It seems work pretty well.

http://www.sidefx.com/docs/houdini14.0/ref/utils/hcpio

Here is the command.

“C:\Program Files\Side Effects Software\Houdini 14.0.201\bin\hcpio.exe” -idI F:\Projects\test_prj_01\halway
_micropoly_01.hip